Hot Stuff.
August 16, 2022
Plumbing guru Gary Klein explains some basic facts about hot water supply.
It’s no mystery what your clients want out of their hot water tap: clean water at the right temperature…and fast. Industry standards call for a 10 second wait for hot water, but few of us get it that quick. Gary Klein of Gary Klein Associates, a California-based plumbing engineer, can explain where the wait comes from and how to calculate what a given piping configuration will deliver.
Spoiler: it’s mostly about the distance from the water heater to the fixture in question.
To see why, take Klein’s typical example of a 2,400-square-foot two-storey house (approximately 30- by 40-foot footprint) above a basement, with the water heater in the basement and the master bathroom on the second floor diagonally opposite the water heater location.
“I think architects lose their licences if they put the water heater close to the fixtures,” Klein comments.
The distance the piping needs to traverse will be approximately the length plus the width of the house plus the height from water heater to the fixture. Copper pipe rarely runs diagonally, Klein notes, as plumbers are trained to install it rectilinearly with as few fittings as possible. In our example, the line will need to cover 30 feet plus 40 feet plus about 20 feet up (assuming the height of the water heater approximately cancels out the height of the shower fixture on the upper floor). Assuming a 3/4-inch trunk line, every 2.5 feet of pipe contains eight ounces of water. Ninety feet of pipe therefore holds 288 ounces – which equates to 2.25 gallons of room-temperature water sitting in the hot water pipe at any time. This is the water that has to be flushed out before the person turning the tap on will start to feel warmer water.
Looking at the advertised flow rate for shower heads of two gallons per minute, you’d think it would be something a little over a minute before the user would get hot water. But the truth turns out to be more complicated. The hot water loses heat to the cold pipe when it initially starts flowing. The pipe has to warm up before the water coming out of the fixture is at full temperature. This is why when you turn on hot water and are waiting for it to warm up, it warms slowly rather than suddenly becoming hot. Because of this effect, Klein’s research shows you need to flush closer to 1.5 to 2.5 times the initial volume of cold water before you get water hot enough to shower. So a median multiplier for the volume would be twice the volume in the pipe, which effectively doubles the wait time at the same flow rate.
But wait, it gets worse. Maximum allowable water pressure into houses in most North American jurisdictions is
80 pounds per square inch. A 20-foot rise from the basement water heater to the fixture creates a pressure drop of nine psi. Twenty psi is lost in the piping. And the anti-scald valves that most modern shower fixtures have drops the pressure another 11 psi, for a grand total of 40 psi lost. The pressure our homeowner will likely get at the shower fixture is about half of what is coming into the house from the street.
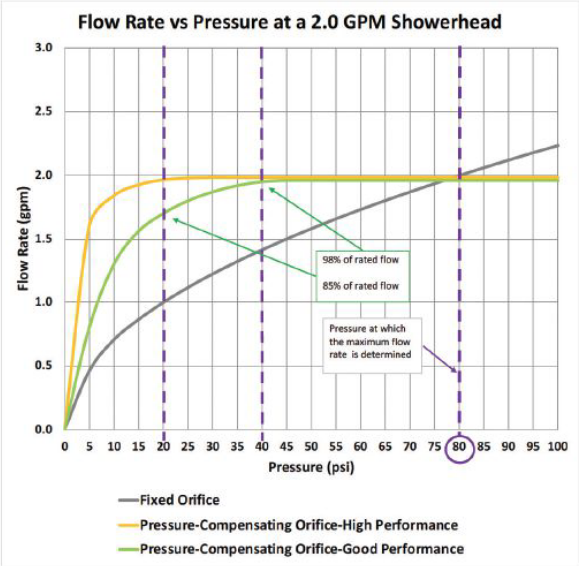
Shower head flow rates are stated as if the shower is being fed at 80 psi. At 40 psi, the flow rate on a two-gallon-per-minute shower head drops to 1.4 gpm. (A pressure-compensating shower head can almost fix this.) Now you have to clear out that 4.5 gallons of water at 1.4 gpm instead of two or 2.5. Your wait time for hot water has
just crept closer to three minutes. And note that many jurisdictions commonly set household water pressure lower. Toronto, for instance, recommends 50 to 70 psi water pressure in homes.
But wait! What about renovations?
The above is fine when pipes are exposed or their layout is otherwise known. Klein has developed a protocol that will allow a homeowner or contractor to determine the key information needed to determine where to install a recirculating pump, which can be used to improve water flow in an existing home.
The purpose of the protocol is to understand the layout of the trunks, branches and twigs (sometimes called fixture branches) within the hot water distribution system. This information can be used to determine the applicability of the installation of one or more demand-activated pumping systems and, if so, where to locate the pump(s). Klein’s protocol was developed so that the evaluation can be done even whether or not pipes are exposed and visible. While the protocol is written assuming the evaluation will be conducted in a home, it can be used in almost any occupancy.
Step 1
Measure the full-on flow rate of the hot water outlets. One way to do this is to measure the volume of water that comes out of the outlet within given period of time. (The volume is a function of flow rate multiplied by time.) This can be done one outlet after the other, with the focus on sinks and showers. A simple way to measure flow rate is to turn the tap on full and capture the water for 15 seconds. Pour this water into a measuring container and determine the volume. Convert the result to gallons. Multiply the result times four to get gallons per minute. There are 16 cups in one gallon. Pick any easy multiple of 60 (5, 6, 10, 12, 15, 20 or 30 seconds) to determine how long you want to capture the water. Longer is better than shorter but volume and weight become an issue (10, 12 or 15 seconds are good compromises). Be sure to use the correct multiplier to get gallons per minute.
When the flow rates of the hot water outlets are significantly different or they are unknown, it is necessary to
measure the volume. When the flow rates can be assumed to be very similar (the water coming out of all the sinks looks and feels about the same), time may be used as a proxy for flow rate.
Step 2
Measure the time-to-tap of hot water at each hot water outlet. This test can take several days (or at least long enough between tests for the temperature of the water in the pipes to cool down – it can take several hours). It may be best to ask the occupants to conduct this portion of the test. First thing in the morning, at one sink, turn the hot tap on full and measure the time it takes for hot water to arrive. Write down the time. Do this on successive mornings for the remaining sinks and showers. If there is a tub/shower combination valve, measure the time using the shower. Now multiply the time–to–tap values by the flow rate to get the volume–to–hot.
Step 3
After completing these timed tests on all the sinks and showers, on the next morning go back to the sink with
the largest volume–to–hot and turn the hot water on full hot and measure the time again. It should be similar to when you measured it the first time, but it may not be identical. This is normal. Immediately after you have hot water at this sink, go back to each previously measured hot water outlet, turn the hot water on full hot, measure the time again and write it down. Do this for the showers too, even if you haven’t measured them before. Compare the measured time (or volume) from the first morning (cold start) and the last morning (hot start for all but the furthest sink). If there is a 50 percent or more decrease in the time from first morning (cold start) to the last morning then the hot water outlet is on the same trunk line as the furthest sink. The higher the percentage reduction, the closer the plumbing fixture is to the trunk line.
You may find that the volume and time did not change much from the cold starts to the day with the hot start at one or more plumbing fixtures. If so, you could repeat Step 3 the next day and see if there is another trunk line (or main branch).
A demand-activated pumping system makes sense to install if the wait and waste is large in a given hot water
location (kitchen, bathroom, laundry), and if that location is regularly used, say a kitchen or master bathroom. If there are two or more hot water locations on the trunk line, an activation mechanism can be installed in each location that tells the pump to turn on when hot water is desired. Wired and wireless buttons are the most common mechanisms used to activate the pump when these systems are installed in retrofit applications. If Step 3 indicates there are two or more main branches and these are used regularly, it would then be effective to install a demand-activated pumping system at the end of each main branch. Each main branch gets its own set of activation mechanisms. The pump is generally placed on each branch under the sink furthest from the water heater on the trunk line or at the end of each main branch. Activating the pump shortly before hot water is needed can significantly reduce the time-to- tap at each commonly used hot water plumbing fixture.
